• Skip to primary navigation
  • Skip to main content
  • Skip to footer
Wisconsin Badger Camp

Wisconsin Badger Camp

  • Camper Registration
  • Contact
  • Badger Camp 1966 Event
  • Donate
  • About
    • History
    • Mission & Philosophy
    • Facilities
      • Grounds
      • Cabin Rentals
    • Staff
    • Photo Gallery
    • Annual Report
  • Programs
    • Summer Programs
    • Application and Forms
    • At Home Activities for Families
  • Employment
    • About Employment
    • Staff Applications
    • Volunteer
  • Ways To Give
    • Donor Advised Funds
      • Building Fund
      • Campership Fund
      • In-Kind Donations
      • Other Grants
      • Wish List
  • Online Camp Store

webwise

DIY Solar Oven

August 27, 2020 By webwise

Introduction: A sunny day is a great day to learn something new and eat a delicious snack. Making a solar oven with a few household supplies can engage participants and foster better understanding of the sun and solar energy!

Size: ANY

Supplies: 1 pizza delivery box, clear tape, plastic wrap, aluminum foil, black construction paper, newspaper, ruler, thermometer, plastic plate.

Objective: Teachable moments, education, project completion, food safety.

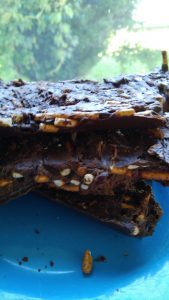
Description: Use box knife to cut open a flap on the lid of the pizza box. The flap should be able to be bent up to create an opening for the box top. Next wrap foil to the bottom side of the flap and tape it down on the top to keep it in place. On the inside of the lid, tape a layer of plastic wrap to create an air tight barrier. Line the inside of the box’s bottom and sides with black construction paper and used rolled up newspapers along the edges of the bottom to reinforce the oven’s insulation. Put food on a plastic plate (NOTE: utilize this oven to cook items that are NOT raw for safety) then place under lid. Open the flap and position the oven so the sun hits the open flap and into the plastic covered opening. This a great, creative way to make s’mores or other outdoors treats.

Filed Under: Uncategorized

Backyard Volcano

July 28, 2020 By webwise

Introduction: Homemade volcanoes are a staple of childhood; from science fairs to home rooms, volcanoes can be made easily and provide and exciting, memorable project that appeals to all kinds of people!

Size: 1-4

Supplies: 1 water bottle, baking soda, vinegar, food coloring, whipping cream.

Objective: Project completion, teachable moments, educational activity, outdoors activity.

Description: Fill water bottle ½ full of baking soda, a small amount of whipping cream, and a few drops of food coloring. Next, fill a measuring cup with ½ cup of vinegar and set aside. Bury the water bottle and surround it with a mound of dirt, leaving the mouth open at the top. Next, pour in the vinegar and watch the eruption!

Check out the Kids Activity Blog for MORE activities for adults and children

How to Build a Volcano

Filed Under: Uncategorized

Bouncy Egg

July 23, 2020 By webwise

Introduction: Homemade volcanoes are a staple of childhood; from science fairs to home rooms, volcanoes can be made easily and provide and exciting, memorable project that appeals to all kinds of people!

Size: 1-4

Supplies: 1 water bottle, baking soda, vinegar, food coloring, whipping cream.

Objective: Project completion, teachable moments, educational activity, outdoors activity.

Description: Fill water bottle ½ full of baking soda, a small amount of whipping cream, and a few drops of food coloring. Next, fill a measuring cup with ½ cup of vinegar and set aside. Bury the water bottle and surround it with a mound of dirt, leaving the mouth open at the top. Next, pour in the vinegar and watch the eruption!

Photo courtesy of unsplash.com!

Filed Under: Uncategorized

Salty Chocolate Bark

June 23, 2020 By webwise

Activity Name: Salty Chocolate Bark

Introduction: The best food ideas bring together flavors, textures and aromas to make something new. Salty chocolate bark gives the bitter sweetness of chocolate and cherries with the saltiness of pretzels for an unforgettable taste.

Size: Serves 24

Supplies: 24 oz. of dark chocolate chips, ½ cup pretzels, ¼ cup dried cherries or raisins, sea salt flakes.

Objective: project completion, following instructions and hands-on work.

Description: Line a baking sheet with parchment paper, then melt the dark chocolate on the stove or in the microwave. Spread chocolate in an even layer on the parchment with a spatula. Cut or break pretzels into pieces and sprinkle with raisin/dried cherries and salt onto the top of the chocolate. Let bark cool for 1 hour then break into pieces and store into sealed bags.

Filed Under: Uncategorized

Sticky Note Wall Bop

June 9, 2020 By webwise

Activity Name: Sticky Note Wall Bop

Introduction: Games are among the most effective ways to teach scholastic concepts and make them transferrable to different environments.

Size: Any

Supplies: bean bags, sticky notes, markers, double-sided tape.

Objective: Competitive play, linguistic skills, word comprehension.

Description: First, place rows of tape on the wall or a board for each participant. Next, right down letters on each sticky note and post them to a wall or other usable surface. Each participant then takes turns throwing the bean bag at the letters to knock them off the wall. For each one, the participant gets to put them on his tape segment. Once all the letters are knocked down, each participant takes each letter they were able to get and tries to make a word. The one who makes the longest word wins the game.

Filed Under: Uncategorized

Paint bomb painting

June 9, 2020 By webwise

Size of group: 1-5

Supplies: Biodegradable Water Balloons, Canvas or Poster Boards or even a large sheet, Washable Finger Paint, Squeeze Bottles

Objective: Create art, project completion, gross motor skills, creativity

Description: When we think of painting we generally think of a paintbrush and some paper. We want to bring you outdoors while being able to create this masterpiece!

Fill the plastic bottles with half water and add a generous amount of paint to each. Once added, shake them both to mix them. Once the paint is mixed fill the balloons with the colored water. This might be a little tricky but gets easier the more you do!

Get all supplies and take them outside!

You will want to place your sheet against a hard outside surface so the balloons break on it when thrown at it. Keep doing this until the artist is done. If the sheet is on the ground, you can have the artist stomp on the balloons and watch that effect.


While this is the easier clean version, you can also use only pain in the balloons which will be messier but more vibrant.


A Cool Variation:


Pin balloons (filled with pain) to a piece of wood painted with a white or black background. Get darts from Walmart and have the artist throw darts at the balloons or poke them with something that will pop the balloon and watch them pop and create a really neat masterpiece.


Filed Under: Uncategorized

  • Page 1
  • Page 2
  • Go to Next Page »
  • Home
  • About
  • Programs
  • Employment
  • Facilities
  • Ways To Give
  • Privacy Policy
  • Cookies Policy
  • Contact

Footer

Main Office (open year round)

Wisconsin Badger Camp
PO Box 723
Platteville, WI 53818
Phone: 608-348-9689
Fax: 608-348-9737

Camp Office (open June 1 – August 20)

Wisconsin Badger Camp
11815 Munz Lane
Prairie du Chien, WI 53821
Phone: 608-348-9689
Fax: 608-348-9737

Follow Us

 Twiiter  Google

Wisconsin Badger Camp © 2025 webwisedesign.com

Powered by Ultimate Auction