• Skip to primary navigation
  • Skip to main content
  • Skip to footer
Wisconsin Badger Camp

Wisconsin Badger Camp

  • Camper Registration
  • Contact
  • Badger Camp 1966 Event
  • Donate
  • About
    • History
    • Mission & Philosophy
    • Facilities
      • Grounds
      • Cabin Rentals
    • Staff
    • Photo Gallery
    • Annual Report
  • Programs
    • Summer Programs
    • Application and Forms
    • At Home Activities for Families
  • Employment
    • About Employment
    • Staff Applications
    • Volunteer
  • Ways To Give
    • Donor Advised Funds
      • Building Fund
      • Campership Fund
      • In-Kind Donations
      • Other Grants
      • Wish List
  • Online Camp Store

Uncategorized

Dots and Boxes

May 6, 2020 By wibadgercamp

It’s the simplest games that become the most fun. Making boxes might sound pretty easy, but when you’re competing against your family or friends, it’s a whole different story.

Size of Group: 1-2

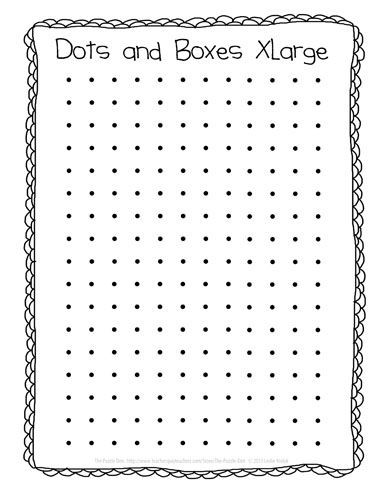
Equipment: A sheet of paper with columns and rows of dots (any size with any number of dots), two writing utensils of different color.

Objective: sportsmanship, concentration, strategy, and problem-solving.


Description: The game begins with one player making a line between two dots. Each player then alternates making either an vertical line or horizontal line between two dots. When a player completes a box, they put their initials inside it and earn a point. The game ends when all possible lines are drawn, and the winner is determined by who completed the most boxes.

Filed Under: Uncategorized

Fruit Glazed Donut Holes

May 6, 2020 By wibadgercamp

Want to spice up a breakfast or snack time? Want to make a short project out of some store-bought items? Try this quick, easy recipe that’s good for kids or adults.

Size of Group: 2-3

Equipment: 12-pk. Donut holes (flavor is discretionary), 2 cups sugar, 1 can of frozen fruit juice concentrate, large bowl, wax paper, tray.

Objective: Learn food handling procedures, understanding food preparation, opportunity to educate on healthy choices and portions, peer-engagement.


Description: Assist participants in reading the label on the donut holes to find out the proper serving size, then divide donut holes between each participant to correspond with that number. Next, mix thawed fruit juice with sugar until it forms a thick glaze, roll each ball in the glaze and place on wax paper to harden.

Filed Under: Uncategorized

Rainy Weather Windsocks

May 6, 2020 By wibadgercamp

Learn about wind and weather with this Clouds and Rain Weather Windsock Craft. Use it to decorate your front window or on the porch at home and watch as it catches the wind!

Images and Original Website can be found here

Size of Group- Any

Materials Needed:

blue construction paper
cotton balls
blue or white yarn
pipe cleaner
scissors
hole punch
glue
tape

Description:

Precut the yarn into 2 foot sections. Smaller pieces may be easier to manage, but anywhere between 1-2 feet will work nicely. Also Start by drawing a raindrop shape to use as a template, and then cut several out of a light blue piece of construction paper. This goes quickly by folding the paper into a small square and cutting many at a time.

First, participants will need to make the clouds. Do this by pulling and spreading the cotton balls (great fine motor activity) and gluing them to a blue piece of construction paper. This may be a good place to stop for a break while the glue dries, although it’s not necessary.

Next, you will want them to roll the paper into a tube and use tape to secure it. Some participants may need help with this part.

After the tube is made, the participants will use a hole punch to punch some holes around the bottom of the windsock (if it’s not already done in preparation).

Next the they will put the yarn through each hole. These do not need to be tied because the raindrops will be attached to each end of the yarn.

This ends up being a great fine motor activity as participants need to carefully poke and pull the yarn through the holes!


Filed Under: Uncategorized

Beaded Pipe Cleaner Flowers

May 6, 2020 By wibadgercamp

These beaded pipe cleaner flowers are so fun! They take less than 10 minutes to make and they’re great for developing fine motor skills. This is a great idea for your outdoor seating area or even inside. The other iodea we have is a bouquet for mothers day!

Size of Group- Any

Materials Needed:

Colors are your choice, One color for the stem, One for all of the petals and one for the center of the flower is needed.

1 Green Pipe cleaner (12″ length)
5 Purple Pipe cleaners (6″ length)
1 Yellow Pipe cleaner (6″ length)
Plastic pony beads
White Glue (optional) or Hot Glue

Thread the pony beads onto the Petal pipe cleaners. any amount is fine, no more than 10-15 though.

Twist together the ends of each pipe cleaner to make the petals. You should end up with 5 teardrop-shaped petals.

Lay the end of one of the petals over top of the 12 inch long green pipe cleaner, leaving about 1.5 inches of green pipe cleaner empty at the end. (As Pictured)

Then twist the end of the petal around the green pipe cleaner to hold it in place.

Place the second petal right next to the first petal (try not to leave any green pipe cleaner showing) and twist the end around the green pipe cleaner to hold it in place.

Continue twisting the end of each petal around the green pipe cleaner until all five have been attached.

Cross the 1.5 inch end of the green pipe cleaner over the longer end of the green pipe cleaner. Again, try to get it tight enough that there’s no green pipe cleaner showing in the middle of the flower.

Then twist the 1.5 inch green pipe cleaner end around the stem. Continue twisting the pipe cleaner down the stem until the entire 1.5 inch end has been twisted in.

The petals will probably be overlapping a little bit, so bend them into position to make your flower shape.

Pinch the end of the yellow pipe cleaner and roll it into a tight spiral.

Add a little bit of glue to the middle of the flower and attach the yellow spiral to the middle of your flower. (The glue gun also works great here!)

The beaded pipe cleaner flowers are pretty heavy, so they won’t stand up on their own. So if you want to make a flower arrangement, you’ll need to insert the green pipe cleaner into a green drinking straw.

Filed Under: Uncategorized

My Own Flip Book

May 6, 2020 By wibadgercamp

We like to encourage reading and creativity in everyone, and there really isn’t a much better way to engage someone in using books than to have them make their own.

Size of Group: 2-6

Equipment: Paper, writing utensils of your choice, scissors, glue, masking or packing tape, stapler.

Objective: Encourage project completion, increase familiarity with books and reading activities, fosters creativity and storytelling, sharing, and peer communication.

Description: Cut down the paper into rectangles of the desired size (preferably between the size of a Post-It note and a notecard), staple papers together into sections of approximately 10-15 sheets, then take all the sections and bind them together with the tape to make the book’s spine, then it’s time to draw out the story by making a picture that changes slightly on each page to tell a gradual story. Once the story is drawn and colored, title the story on the first page, and don’t forget to put the author’s name on it!

Filed Under: Uncategorized

Surprise Rainbow Activity

May 6, 2020 By wibadgercamp

Original Post found here includes 2nd activity!

Size of Group: 1 – 2

Objective: Creativity, Fun, Project Completion, Social Skills.

Materials Needed:

  • Paper Towels
  • Washable Markers
  • Black Sharpie
  • Water
  • A large bowl
  • A baking tray or another tray to protect your table
  • A dish for the water

Description:

Paper Towel You Drop in Water

For this activity, you will need 1 sheet of paper towel you can fold in half. Washable markers, a black permanent marker, and a dish or bowl with water.

1. First, fold over 1 sheet of paper towel.

2. Start by drawing lines for a rainbow with the black permanent marker. You need a permanent marker so that the black marker will not bleed.

Color in with Black Sharpie

You want to press hard or go over the lines a few times so that it bleeds through to the second layer of the paper towel.

3. On the bottom layer, start coloring in your rainbow with washable markers. You need washable markers here so that it will bleed through to the top layer.

Washable Marker Rainbow

4. Keep adding all of the colors to the bottom layer.

Washable Marker Rainbow Experiment

5. Now it is ready to drop in the water! Add some water into a dish or bowl. Then drop it into the water and watch the magic! Your rainbow will appear before your eyes.

Filed Under: Uncategorized

  • « Go to Previous Page
  • Page 1
  • Interim pages omitted …
  • Page 9
  • Page 10
  • Page 11
  • Page 12
  • Page 13
  • Page 14
  • Go to Next Page »
  • Home
  • About
  • Programs
  • Employment
  • Facilities
  • Ways To Give
  • Privacy Policy
  • Cookies Policy
  • Contact

Footer

Main Office (open year round)

Wisconsin Badger Camp
PO Box 723
Platteville, WI 53818
Phone: 608-348-9689
Fax: 608-348-9737

Camp Office (open June 1 – August 20)

Wisconsin Badger Camp
11815 Munz Lane
Prairie du Chien, WI 53821
Phone: 608-348-9689
Fax: 608-348-9737

Follow Us

 Twiiter  Google

Wisconsin Badger Camp © 2025 webwisedesign.com

Powered by Ultimate Auction